

How to build a feature-rich RESTful blog API with Node.js, express and MongoDB.


API and RESTful API
Let's start by understanding what an API is as well as what it meas for an API to be RESTful.
An application programming interface (API) is an interface that has been built to help two different systems or applications interact with one another. APIs are the standard and most sought-after solution when it comes to data transmission and interaction between client and server in modern web development.
REpresentational State Transfer (REST) API also known as RESTful API is an application programming interface that is built following the REST architectural style and can interact with RESTful web services.
For an API to be considered RESTful, it has to conform to these principles:
Client-server design: Requests are to be made from a client over an HTTP connection to a server.
Stateless: Requests are independent of each other and no state of any kind is stored.
Uniform Interface: Clients and servers are separated and both only handle what they are meant to handle. Hence, ensuring portability.
Cacheable: Most clients cache responses, therefore responses must either directly or indirectly define themselves as cacheable or not to avoid clients reusing stale data in response to further requests.
Layered system: There might be intermediary servers between the client and the end server. These intermediate servers can serve as a security layer, caching layer, load-balancing layer or other any other important functionality.
In this article, I explained in detail how to build a feature-rich blog API using Node.js.
Below are what we are going to achieve at the end of this article tutorial:
Authentication using JWT
CRUD (Create, Read, Update, Delete) operations
How to implement filtering, pagination, sorting etc. on routes that return long lists of data like our GET /blogs route.
Data validation
Email sending
Customized global error handling
These are the main features we would be implementing in this blog API but of course, there are tons of other cool stuff you'd learn along the way.
There are links, diagrams and code snippets throughout this article to help you better understand how to implement each feature.
As a prerequisite, you need to have at least a little experience working with Node.js and its minimal and flexible framework, express.js. A good understanding of a document database like MongoDB is also good to have.
Tech Stack
Node.js and Express as the JavaScript runtime environment and server framework.
MongoDB is our database of choice.
Mongoose as an ODM library of choice
Passport for authentication. This API uses the JWT (JSON Web Token) strategy.
Project Setup
Requirements
To follow along with this tutorial, ensure to have Node installed on your device. You will also need to set up MongoDB locally on your machine or use the cloud version, MongoDB Atlas.
After successfully meeting the requirements, the next step is to create the project folder. Open up your terminal or CLI and "cd" to the location where you want your project and create the project directory. For example,
cd ./Desktop
mkdir blogging-api
Of course, "blogging-api" is just a name I choose. You can name the project directory as you like.
Before we continue, below is what the final project structure looks like. This would guide us on which folder or file to create. I advise to always reference if the folders and files structure becomes unclear at any point.
```sh
  ├── package.json
  ├── package-lock.json
  ├── example.env
  ├── .env
  ├── server.js
  ├── app.js
  ├── config
  │   ├── db.js
  ├── routes
  │   ├── authRoutes.js
  │   ├── blogRoutes.js
  │   ├── userRoutes.js
  ├── controllers
  │   ├── authController.js
  │   ├── blogController.js
  │   ├── userController.js
  │   ├── errorController.js
  │   ├── rootController.js
  ├── models
  │   ├── blogModel.js
  │   ├── userModel.js
  ├── tests
  │   ├── auth.route.test.js
  │   ├── blogs.route.test.js
  │   ├── users.route.test.js
  └──  utils
  │   ├── apiFeatures.js
  │   ├── appError.js
  │   ├── catchAsync.js
  │   ├── emailSender.js
  └── └── genToken.js
```
Alright, we can now fill the project directory with some folders and files. Let's start with generating a package.json file using the command below.
npm init -y
npm is a command line client for the default Node.js package manager, npm
The -y flag just accepts all default suggestions.
Next, let's install all the libraries/packages our app would depend on using the command below.
npm install bcrypt cors dotenv express express-mongo-sanitize express-rate-limit helmet hpp joi jsonwebtoken mongoose morgan nodemailer passport passport-jwt validator winston xss
These dependencies and their corresponding dependencies would be stored in a folder called node_modules. Also another file, package-lock.json which contains detailed information about these libraries and their corresponding dependencies would also be created.
There is one more dependency I would like us to have, nodemon. Install it as a dev dependency i.e a dependency not used in the application but just used for its development.
nodemon - a CLI tool that helps in building Node.js based application by automatically restarting the node app when changes in files are detected. Install nodemon as a dev dependency using this command;
npm install nodemon --save-dev
If you wish to install nodemon globally so you don't have to install it for every project, use the command below,
npm install -g nodemon
-g flag stands for global and makes the package available globally on your machine.
One final step before we start writing code is to create two npm scripts in the package.json file.
"scripts": {
    "start": "node server.js",
    "dev": "nodemon server.js"
  }
Both of which can be used to start up our application. The dev script will be used to start our application in development while the start script, in production.
As you might have noticed from the scripts, server.js would be the entry point to our application. Therefore, let's go ahead to create the file using the command below.
touch server.js
This file will handle stuff like connecting to the database, setting up the server to listen for connections etc.
Environment variables
Environment variables allow us to configure our application for multiple environments which makes the application behave differently in each environment such as development, test, stage, and production.
Let's go ahead and create some environment variables. The environment variables file has the .env extension. But it has become a convention to just call the file .env
Next, let's create a .env file for the environment variables
touch .env
Creating some environmental variables.
// .env
PORT = 8000
HOST = '127.0.0.1'
NODE_ENV = 'development'
API_BASE_URL = "/api/v1"
Now let's load these env variables into process.env using an npm package we installed earlier, dotenv. We do this in the server.js file as it is the entry point to our application.
N.B: We only need to do this in the server.js file cause as I already mentioned a couple of times now, it is the entry point of the entire app. All other files will then be able to access the environment variables using process.env.
// server.js
const dotenv = require("dotenv");
dotenv.config(); // loads enviroment variables into process.env
Moving on, let's set up our express app in app.js
touch app.js
We would also need a couple of dependencies in this file, so let's go ahead importing them.
// app.js
const express = require("express");
const helmet = require("helmet");
const cors = require("cors");
const hpp = require("hpp");
const mongoSanitize = require("express-mongo-sanitize");
const xss = require("xss-clean");
const rateLimit = require("express-rate-limit");
Quite a lot right? Yeah, it'd make more sense why we need them when we use them in code.
Next is to create an express app.
// app.js
const app = express();
Next, let's add some global middleware
// app.js

// helmet middlewares (secures the Express app by setting various HTTP headers.)
app.use(helmet());

// enables CORS for all origins!
app.use(cors());

// Body parsers middlewares
app.use(express.json());
app.use(express.urlencoded({ extended: false }));

// xss attacks and NoSQL query injection prevention middlewares
app.use(mongoSanitize()); // sanitizes user-supplied data to prevent MongoDB Operator Injection
app.use(xss()); // sanitize user input coming from POST body, GET queries, and url params

// Middleware to prevent http parameter pollution
app.use(hpp());

// Middleware for rate limiting
const apiLimiter = rateLimit({
  max: 100, // max allowable number of request from an IP address in a given timeframe
  windowMs: 60 * 60 * 1000, // 1 hour
  message: "Too many requests from your IP address, please try again later.",
});
app.use("/api", apiLimiter); // Use to limit repeated requests to public APIs
That's quite a lot of middleware, right? Yeah just take your time to go through them. Each line is well commented on and explains what it does. You can also check the npm docs of these libraries to learn more.
Just before we move on, we will use the MVC architecture to build this API. MVC is a software architectural pattern that separates application concerns/logic into three main logical components: the Model, the View and the Controller. In this tutorial, we are only concerned with the Model and Controller components of the MVC architecture.
So let's get our controllers ready before creating some routes.
Creating the controllers' directory
mkdir controllers
Next, let's create a controller to handle requests to the root endpoints.
cd ./controllers
touch rootController.js
Paste the code below into rootController.js
// rootController.js
module.exports = (req, res, next) => {
  return res.status(200).json({
    status: "success",
    message:
      "Welcome to Blogging API 📝. Go to https://github.com/omobolajisonde/Blogging-app#api-reference` to find out all this API has to offer.",
  });
};
Let's now go ahead to create the routes for this controller.
// app.js
const rootController = require("./controllers/rootController");

const API_BASE_URL = process.env.API_BASE_URL || "/api/v1";

app.get("/", rootController);
app.get("/api", rootController);
app.get("/api/v1", rootController);
Speaking of routes (also known as endpoints), the root or base endpoint for this API is /api/v1. But I don't want / or /api to be considered as unknown routes so the root controller handles requests to both endpoints as well.
Next, let's handle requests to unknown routes
// app.js

// Any request that makes it to this part has lost it's way
app.all("*", (req, res, next) => {
  return res.status(404).json({
    status: "failed",
    message: `Can't find ${req.originalUrl} on this server! The resource you're looking for can't be found. Please check the URL before trying again.`,
  });
});
Finally, let's export our express app, so we can use it to listen for connections in server.js
// app.js
module.exports = app
At this point, the app.js file should be similar to this:
// app.js
const express = require("express");
const helmet = require("helmet");
const cors = require("cors");
const hpp = require("hpp");
const mongoSanitize = require("express-mongo-sanitize");
const xss = require("xss-clean");
const rateLimit = require("express-rate-limit");

const rootController = require("./controllers/rootController");

const app = express();

// helmet middlewares (secures the Express app by setting various HTTP headers.)
app.use(helmet());

// enables CORS for all origins!
app.use(cors());

// Body parsers middlewares
app.use(express.json());
app.use(express.urlencoded({ extended: false }));

// xss attacks and NoSQL query injection prevention middlewares
app.use(mongoSanitize()); // sanitizes user-supplied data to prevent MongoDB Operator Injection
app.use(xss()); // sanitize user input coming from POST body, GET queries, and url params

// Middleware to prevent http parameter pollution
app.use(hpp());

// Middleware for rate limiting
const apiLimiter = rateLimit({
  max: 100, // max allowable number of request from an IP address in a given timeframe
  windowMs: 60 * 60 * 1000, // 1 hour
  message: "Too many requests from your IP address, please try again later.",
});
app.use("/api", apiLimiter); // Use to limit repeated requests to public APIs

const API_BASE_URL = process.env.API_BASE_URL || "/api/v1";

app.get("/", rootController);
app.get("/api", rootController);
app.get("/api/v1", rootController);

// Any request that makes it to this part has lost it's way
app.all("*", (req, res, next) => {
  return res.status(404).json({
    status: "failed",
    message: `Can't find ${req.originalUrl} on this server! The resource you're looking for can't be found. Please check the URL before trying again.`,
  });
});

module.exports = app;
In server.js, import the express app and listen for connections
// server.js
const app = require("./app");

const PORT = process.env.PORT || 8080;
const HOST = process.env.HOST || "localhost";

// listens for connections
const server = app.listen(PORT, HOST, () => {
    console.log(`Server started at port, ${PORT}...`);
});
});
That's right, you access env variables using process.env.
Whew! We can finally start up our app using the npm script we wrote earlier, npm run dev. If you've done everything right so far, you should see this on your terminal, indicating your server is running and listening for connections.

At this point, your server.js file should be like this:
const dotenv = require("dotenv");
dotenv.config(); // loads enviroment variables into process.env

const app = require("./app");

const PORT = process.env.PORT || 8080;
const HOST = process.env.HOST || "localhost";

// listens for connections
app.listen(PORT, HOST, () => {
  console.log(`Server started at port, ${PORT}...`);
});
If at this point, your server is not running refer to the files above to debug what went wrong.
Once your server is running, we can now connect to a MongoDB database. I will do this in a file called db.js inside config directory.
mkdir config
cd config
touch db.js
Paste the code to connect to a MongoDB database using the mongoose ODM library in db.js
// db.js
const mongoose = require("mongoose");

const DATABASE_URL = process.env.DATABASE_URL;

module.exports = function () {
  mongoose.connect(DATABASE_URL);
  mongoose.connection.on("connected", () => {
    console.log("connected to mongoDB successfully...");
  });
  mongoose.connection.on("error", (err) => {
    console.log("connection to mongoDB failed...", err);
  });
};
We used a new env variable in this file, let's go ahead and add it in .env
DATABASE_URL = "<YOUR DB URL>"
Now, let's import db.js in server.js to connect to establish a connection to the database.
// server.js
const connectToMongoDB = require("./config/db");
connectToMongoDB(); // connects to a MongoDB server
On your terminal you should see this message if everything goes well

Server.js should be something like this now
const dotenv = require("dotenv");
dotenv.config(); // loads enviroment variables into process.env

const app = require("./app");
const connectToMongoDB = require("./config/db");

connectToMongoDB(); // connects to a MongoDB server

const PORT = process.env.PORT || 8080;
const HOST = process.env.HOST || "localhost";

// listens for connections
app.listen(PORT, HOST, () => {
  console.log(`Server started at port, ${PORT}...`);
});
At this point, the project is all set up.
Modeling the Data
We don't have many entities in this application, just Users and Blogs therefore our data relationship can't be a complex one.
Below, is a schematic diagram of how our data would be modeled and the relationship between collections.
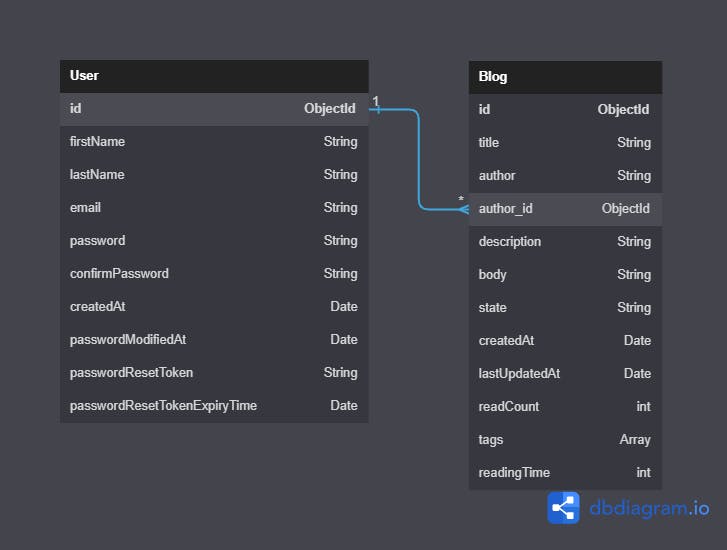
From the diagram above, it is obvious that the User collection/table has a one-to-many relationship with the Blog collection/table i.e a user can author many blogs or many blogs can belong to one user.
Let's now implement this in code. Following the MVC architecture, let's go ahead to create the model's directory and the models.
mkdir models
cd models
touch userModel.js blogModel.js
Paste the code below in the userModel.js file.
// userModel.js
const mongoose = require("mongoose");
const validator = require("validator");
const bcrypt = require("bcrypt");

const Schema = mongoose.Schema;

const userSchema = new Schema({
  firstName: {
    type: String,
    required: [true, "Please provide your firstname."],
  },
  lastName: {
    type: String,
    required: [true, "Please provide your lastname."],
  },
  email: {
    type: String,
    required: [true, "Please provide your email address."],
    unique: true,
    validate: [validator.isEmail, "Please provide a valid email address."],
  },
  password: {
    type: String,
    required: [
      true,
      "It's a dangerous world online! Please provide a password.",
    ],
    minLength: 6,
    select: false, // doesn't add this field on Read query
  },
  confirmPassword: {
    type: String,
    required: [true, "Please confirm your password."],
    minLength: 6,
    select: false,
    validate: {
      validator: function (val) {
        return val === this.password;
      },
      message: "Passwords must match.",
    },
  },
  createdAt: {
    type: Date,
    default: Date.now(),
  },
  passwordModifiedAt: { type: Date },
  passwordResetToken: { type: String },
  passwordResetTokenExpiryTime: Date,
});

// Pre document hook for hashing password before save
userSchema.pre("save", async function (next) {
  if (!this.isModified("password")) return next(); // prevents hashing of unmodified password
  // Hashes the password of the currently processed document
  const hashedPassword = await bcrypt.hash(this.password, 12);
  // Overwrite plain text password with hash
  this.password = hashedPassword;
  // Clear the confirm password field
  this.confirmPassword = undefined;
  next();
});

const User = mongoose.model("User", userSchema);

module.exports = User;
Likewise, paste the code below in blogModel.js
const mongoose = require("mongoose");

const Schema = mongoose.Schema;
const ObjectId = mongoose.Schema.Types.ObjectId;
const blogSchema = new Schema(
  {
    title: {
      type: String,
      required: [true, "Please provide the blog title."],
      trim: true,
      unique: true,
      minLength: [5, "Blog title cannot be lesser than 5 characters"],
      maxLength: [50, "Blog title cannot be longer than 50 characters"],
    },
    author: {
      type: String,
      required: [true, "A blog must have an author."],
    },
    author_id: {
      type: ObjectId,
      required: [true, "Please provide the blog author's Id."],
      ref: "User",
    },
    description: { type: String, trim: true },
    body: {
      type: String,
      trim: true,
      required: [true, "Please provide the blog body."],
    },
    state: {
      type: String,
      trim: true,
      default: "draft",
      enum: {
        values: ["draft", "published"],
        message: "A blog can only be in two states, draft or published.",
      },
    },
    createdAt: { type: Date, default: Date.now() },
    lastUpdatedAt: { type: Date, default: Date.now() },
    readCount: { type: Number, default: 0 },
    tags: [String],
    readingTime: { type: Number, required: true },
  },
  { toJSON: { virtuals: true }, toObject: { virtuals: true } }
);

// Virtual property (does not persist in the database, but returned on query)
blogSchema.virtual("formattedReadingTime").get(function () {
  if (!this.readingTime) return undefined;
  const IntAndDecimalParts = this.readingTime.toFixed(3).split(".");
  const formattedReadingTime = `${IntAndDecimalParts[0]}min ${Math.ceil(
    (IntAndDecimalParts[1] / 1000) * 60
  )}sec read`;
  return formattedReadingTime;
});

const Blog = mongoose.model("Blog", blogSchema);
module.exports = Blog;
MongoDB automatically creates a unique _id field which would serve as the primary key if not explicitly specified in the schema.
Utilities
Before we proceed, we need some helper or utility functions to make our lives easier.
Create these files
mkdir utils
cd utils
touch appError.js catchAsync.js
appError.js
// appError.js
class AppError extends Error {
  constructor(message, statusCode) {
    super();
    this.message = message;
    this.statusCode = statusCode;
    this.status = `${this.statusCode}`.startsWith("4")
      ? "Client Error!"
      : "Internal Server Error";
    this.isOperational = true;
    Error.captureStackTrace(this, this.constructor); // persists the function where the error occured in the Error stack trace. (not 100% sure)
  }
}

module.exports = AppError;
Here we create a custom error class, AppError which inherits from the Error class. Instances of this class will be used all over the app to catch errors and handle them properly.
The
.isOperationalproperty that every instance of this class will have will be used to distinguish them from other errors.
catchAsync.js
catchAsync.js
// This module just exports a function that handles async functions/handlers/controllers

module.exports = (fn) => {
  // accepts the async func as an arg.
  return (req, res, next) => {
    // returns another function which expects to be called with express req, res and next objects
    fn(req, res, next).catch(next); // the function calls the async function; "fn" and if any error occurs, the catch block calls the next function with the error as arg which will be handled by the global error handling middleware.
  };
};
- exports a function that catches errors in an async function and sends it to the global error handling middleware.
For now, these are the utility files we need.
Global error-handling
Express catches synchronous errors that occur in route handlers or middleware and sends it to the default error handler (if there is no global error handling middleware) and outputs the result in HTML format.
This is not enough not only cause the format express outputs the error is not too useful but also because express, as at the time of writing does not catch asynchronous errors. Hence, the need for a global error handling middleware.
Unlike other middleware, which accepts the req, res and next objects only the global error handling middleware accepts in addition, the error that occurred as an argument, then the other 3 i.e error, req, res and next in this order.
The next function, available to all middleware as an argument, when called without any parameter simply hands over the operation to the next middleware in the middleware stack but when called with an argument it is expected to be an error which will be handled by the global error handling middleware.
Therefore, this is exactly how we would catch and handle all async errors in our app. That's exactly what the function in catchAsync.js does.
Let's go ahead and create our global error-handling middleware.
First, let's create a new folder called controllers where all our controllers would go. Then the errorController.js file where the global error handling middleware will be.
mkdir controllers
cd controllers
touch errorController.js
errorController.js
// errorController.js
const AppError = require("../utils/appError");

const handleDBCastError = (err) => {
  const message = `Invalid ${err.path}: ${err.value}`;
  return new AppError(message, 400);
};

const handleDBDuplicateError = (err) => {
  const message = `Duplicate value, '${
    Object.values(err.keyValue)[0]
  }' for the '${Object.keys(err.keyPattern)[0]}' field.`;
  return new AppError(message, 400);
};

const handleValidationError = (err) => {
  let message;
  if (!err.errors) {
    message = err.message;
  } else {
    const values = Object.values(err.errors).map((val) => val.message);
    message = `Invalid input data! ${values.join(". ")}`;
  }

  return new AppError(message, 400);
};

const handleJWTError = () =>
  new AppError("Invalid token! Please login again.", 401);
const handleJWTExpiredError = () =>
  new AppError("Token expired! Please login again.", 401);

// Development env response for errors
const sendErrorDev = (err, res) => {
  return res.status(err.statusCode).json({
    status: err.status,
    message: err.message,
    stack: err.stack,
    error: err,
  });
};

// Prod env response for errors
const sendErrorProd = (err, res) => {
  if (err.isOperational) {
    return res.status(err.statusCode).json({
      status: err.status,
      message: err.message,
    });
  } else {
    console.error(err);
    return res.status(500).json({
      status: "Internal server error",
      message: "Something went terribly wrong!",
    });
  }
};

module.exports = (err, req, res, next) => {
  err.statusCode = err.statusCode || 500;
  err.status = err.status || "An Internal server error has occured!";
  if (process.env.NODE_ENV === "development") {
    sendErrorDev(err, res);
  } else if (process.env.NODE_ENV === "production") {
    // let error = JSON.parse(JSON.stringify(err)); // cause it is not ideal to manipulate function args. Also it was done this way cause the name property is only available when the output is JSON and not Object
    let error = err;
    if (error.name === "CastError") {
      error = handleDBCastError(error); // Returns an Instance of our AppError which ofc will add the isOperational property set to true.
    }
    if (error.code === 11000) {
      error = handleDBDuplicateError(error);
    } // handles error due to value not unique in a field with the unique constraint
    if (error.name === "ValidationError") {
      error = handleValidationError(error);
    }
    if (error.name === "JsonWebTokenError") {
      error = handleJWTError(error);
    }
    if (error.name === "TokenExpiredError") {
      error = handleJWTExpiredError(error);
    }
    sendErrorProd(error, res);
  }
};
This file exports the global error-handling middleware which handles all possible errors that might occur.
The response also depends on the environment. When in the development environment the entire info about the error is explicitly stated in the response to aid debugging while only standard and literal responses is returned in production.
Let's finally use the global error handling middleware in app.js
// app.js
const globalErrorMiddleware = require("./controllers/errorController");

// Global error handling middleware

app.use(globalErrorMiddleware);
latest app.js snapshot
// app.js
const express = require("express");
const helmet = require("helmet");
const cors = require("cors");
const hpp = require("hpp");
const mongoSanitize = require("express-mongo-sanitize");
const xss = require("xss-clean");
const rateLimit = require("express-rate-limit");

const rootController = require("./controllers/rootController");
const globalErrorMiddleware = require("./controllers/errorController");

const app = express();

// helmet middlewares (secures the Express app by setting various HTTP headers.)
app.use(helmet());

// enables CORS for all origins!
app.use(cors());

// Body parsers middlewares
app.use(express.json());
app.use(express.urlencoded({ extended: false }));

// xss attacks and NoSQL query injection prevention middlewares
app.use(mongoSanitize()); // sanitizes user-supplied data to prevent MongoDB Operator Injection
app.use(xss()); // sanitize user input coming from POST body, GET queries, and url params

// Middleware to prevent http parameter pollution
app.use(hpp());

// Middleware for rate limiting
const apiLimiter = rateLimit({
  max: 100, // max allowable number of request from an IP address in a given timeframe
  windowMs: 60 * 60 * 1000, // 1 hour
  message: "Too many requests from your IP address, please try again later.",
});
app.use("/api", apiLimiter); // Use to limit repeated requests to public APIs

app.get("/", rootController);
app.get("/api", rootController);
app.get("/api/v1", rootController);

// Any request that makes it to this part has lost it's way
app.all("*", (req, res, next) => {
  return res.status(404).json({
    status: "failed",
    message: `Can't find ${req.originalUrl} on this server! The resource you're looking for can't be found. Please check the URL before trying again.`,
  });
});

// Global error handling middleware

app.use(globalErrorMiddleware)

module.exports = app;
Now that we have implemented robust error handling, let's go ahead with the rest of the project.
Authentication
Authentication is a very crucial piece of an application that implements one. It has to be robustly built taking into account every possible loophole/edge case. While authentication can be implemented from scratch, it is often common to leverage any of the existing third-party authentication services like Auth0, AWS Cognito, Google Firebase etc. or an all-in-one authentication library like passport.js.
As I have mentioned earlier we are using one of passport's many strategies, the JWT strategy to authenticate some requests in our express app. We are using the JWT strategy because we don't want to store a user's login state in sessions as our RESTful API is meant to be stateless. Instead, we issue a JWT on successful authentication that expires after a specific period, in our case, 10h. This JWT encodes the user's unique identifier and is meant to be sent as an authentication header (Bearer token) along with authenticated requests.
Since our API would need users, we need to create a signup and of course sign in route to authenticate them.
Speaking of routes, let's create a routes folder where all our routes would go.
In Node.js, it's a standard to create a Router which is like a sub-app to handle requests to related routes. For example, to handle authentication-related requests, we can create a Router for it.
mkdir routes
cd ./routes
touch authRoutes.js
Let's go ahead creating the Router in this file.
// authRoutes.js
const express = require("express");

const router = express.Router();

module.exports = router;
Let's import this Router in app.js
// app.js
const authRouter = require("./routes/authRoutes");
Next is to use it.
// app.js
const API_BASE_URL = process.env.API_BASE_URL || "/api/v1";
app.use(`${API_BASE_URL}/auth`, authRouter);
Remember our API_BASE_URL? So any request to /api/v1/auth would be handled by the authRouter or sub-app.
Back in authRouter.js, let's create the signup and sign in routes
// authRouter.js
router.post("/signup"); // i.e /api/v1/auth/signup
router.post("/signin"); // i.e /api/v1/auth/signin
/signup full path is /api/v1/auth/signup
/signin full path is /api/v1/auth/signin
This won't work yet, without their controllers. In the controller's directory, create a file called authController.js where the authentication request handlers/controllers will live.
cd ./controllers
touch authControllers.js
authControllers.js
// authControllers.js
const AppError = require("../utils/appError");

const User = require("../models/userModel");
const catchAsync = require("../utils/catchAsync");
const genToken = require("../utils/genToken");

exports.signUpUser = catchAsync(async (req, res, next) => {
  const { firstName, lastName, email, password, confirmPassword } = req.body;
  const user = await User.create({
    firstName,
    lastName,
    email,
    password,
    confirmPassword,
  });
  user.password = undefined; // so the password won't show in the output and as payload in the token
  user.__v = undefined;
  const token = genToken(user);
  return res.status(201).json({
    status: "success",
    token,
    data: {
      user,
    },
  });
});

exports.signInUser = catchAsync(async (req, res, next) => {
  const { email, password } = req.body;
  if (!email || !password)
    return next(
      new AppError("Bad request! Email and Password is required.", 400)
    );
  const user = await User.findOne({ email }).select("+password");
  if (!user || !(await user.isCorrectPassword(password)))
    return next(
      new AppError("Unauthenticated! Email or Password incorrect.", 401)
    );
  user.password = undefined;
  user.__v = undefined;
  const token = genToken(user);
  return res.status(200).json({
    status: "success",
    token,
    data: {
      user,
    },
  });
})
We used a function called genToken to generate JWT. Let's go ahead and create this file and the function in the utils folder.
cd ./utils
touch genToken.js
genToken.js
// genToken.js
const jwt = require("jsonwebtoken");

module.exports = function (user) {
  const payload = { user };
  const token = jwt.sign(payload, process.env.JWT_SECRET, {
    algorithm: "HS256",
    expiresIn: process.env.JWT_EXPIRES_IN,
  });
  return token;
};
We have used two new env variables, JWT_SECRET ; the secret/key used to sign the token and JWT_EXPIRES_IN the period before the JWT expires.
In our .env file,
JWT_SECRET="Use a very strong secret"
JWT_EXPIRES_IN="10h"
the latest snapshot of .env file
// .env
PORT = 8000
HOST = '127.0.0.1'
NODE_ENV = 'development'
API_BASE_URL = "/api/v1"

JWT_SECRET="Use a very strong secret"
JWT_EXPIRES_IN="10h"
Let's use the signup and sign in controllers in the authRoutes.js file
// authRoutes.js
const {
  signUpUser,
  signInUser
} = require("../controllers/authController");

const router = express.Router();

router.post("/signup", signUpUser);
router.post("/signin", signInUser);

module.exports = router;
Above is the latest snapshot of authRoutes.js
CRUD operations on Blog collection
Now that users get issued a JWT on signup or sign-in that can be used to authenticate requests, let's go ahead creating the Blog routes.
Following the same steps as we did for the auth Router, let's create a Blog Router or sub app too and use it in app.js. Since we are here, let's do the same for the user Router too.
cd ./routes
touch blogRoutes.js userRoutes.js
Paste the code below in both files
const express = require("express");

const router = express.Router();

module.exports = router;
Let's import and use them in app.js
// app.js
const userRouter = require("./routes/userRoutes");
const blogRouter = require("./routes/blogRoutes");

app.use(`${API_BASE_URL}/users`, userRouter);
app.use(`${API_BASE_URL}/blogs`, blogRouter);
the latest snapshot of app.js
const express = require("express");
const helmet = require("helmet");
const cors = require("cors");
const hpp = require("hpp");
const mongoSanitize = require("express-mongo-sanitize");
const xss = require("xss-clean");
const rateLimit = require("express-rate-limit");

const rootController = require("./controllers/rootController");
const globalErrorMiddleware = require("./controllers/errorController");
const authRouter = require("./routes/authRoutes");
const userRouter = require("./routes/userRoutes");
const blogRouter = require("./routes/blogRoutes");

const app = express();

// helmet middlewares (secures the Express app by setting various HTTP headers.)
app.use(helmet());

// enables CORS for all origins!
app.use(cors());

// Body parsers middlewares
app.use(express.json());
app.use(express.urlencoded({ extended: false }));

// xss attacks and NoSQL query injection prevention middlewares
app.use(mongoSanitize()); // sanitizes user-supplied data to prevent MongoDB Operator Injection
app.use(xss()); // sanitize user input coming from POST body, GET queries, and url params

// Middleware to prevent http parameter pollution
app.use(hpp());

// Middleware for rate limiting
const apiLimiter = rateLimit({
  max: 100, // max allowable number of request from an IP address in a given timeframe
  windowMs: 60 * 60 * 1000, // 1 hour
  message: "Too many requests from your IP address, please try again later.",
});
app.use("/api", apiLimiter); // Use to limit repeated requests to public APIs

app.get("/", rootController);
app.get("/api", rootController);
app.get("/api/v1", rootController);

app.use(`${API_BASE_URL}/auth`, authRouter);
app.use(`${API_BASE_URL}/users`, userRouter);
app.use(`${API_BASE_URL}/blogs`, blogRouter);

// Any request that makes it to this part has lost it's way
app.all("*", (req, res, next) => {
  return res.status(404).json({
    status: "failed",
    message: `Can't find ${req.originalUrl} on this server! The resource you're looking for can't be found. Please check the URL before trying again.`,
  });
});

module.exports = app;
Let's create the blogs endpoints in the blogRoutes.js
// blogRoutes.js
const express = require("express");
const passport = require("passport");

const {
  getAllBlogs,
  getAllMyBlogs,
  getBlog,
  createBlog,
  patchBlog,
  deleteBlog,
} = require("../controllers/blogController");
const { blogValidation } = require("../middlewares/validationMiddleware");

const router = express.Router();

router
  .route("/")
  .get(getAllBlogs)
  .post(
    passport.authenticate("jwt", { session: false }),
    blogValidation,
    createBlog
  );

router
  .route("/my")
  .get(passport.authenticate("jwt", { session: false }), getAllMyBlogs);

router
  .route("/:id")
  .get(getBlog)
  .patch(passport.authenticate("jwt", { session: false }), patchBlog)
  .delete(passport.authenticate("jwt", { session: false }), deleteBlog);

module.exports = router;
A lot of stuff going on here, I know. Let's break it down.
We required the passport library to authenticate some routes.
Also, we imported all the blog controllers which we are going to create in a bit.
We have been talking about the passport's JWT strategy, let's finally configure and implement it.
First things first, let's create a file called passport.js in a directory called middlewares
mkdir middlewares
touch passport.js
passport.js
// passport.js
const passport = require("passport");
const JWTStrategy = require("passport-jwt").Strategy;
const ExtractJWT = require("passport-jwt").ExtractJwt;

const User = require("../models/userModel");
const AppError = require("../utils/appError");

passport.use(
  "jwt",
  new JWTStrategy(
    {
      jwtFromRequest: ExtractJWT.fromAuthHeaderAsBearerToken(),
      secretOrKey: process.env.JWT_SECRET,
    },
    async (payload, done) => {
      try {
        // Check if the user associated with token still exists
        const claimUser = await User.findById(payload.user._id);
        if (!claimUser)
          return done(
            new AppError("User associated with token no longer exists.", 401)
          );
        // Check if the password has been changed after token was issued
        const passwordModified = claimUser.passwordModified(payload.iat);
        if (passwordModified)
          return done(
            new AppError(
              "Invalid token! User changed password after this token was issued. Signin again to get a new token.",
              401
            )
          );
        // Grant access!
        done(null, payload.user);
      } catch (error) {
        done(error);
      }
    }
  )
);
Here we configured passport's JWT strategy. We specified that the token should be extracted from the authorization header of the request as Bearer token.
The rest of the code decodes the JWT extracts the encoded payload which contains the user's Id and does all other necessary checks to ensure the user provided a valid token.
Still in blogRoutes.js, I imported a middleware called blogValidation which uses the JOI library to validate the blog data to be created.
Let's create this file.
 cd ./middlewares
touch validationMiddleware.js
validationMiddleware.js
// validationMiddleware.js
const Joi = require("joi");

const catchAsync = require("../utils/catchAsync");

exports.blogValidation = catchAsync(async (req, res, next) => {
  await blogSchema.validateAsync(req.body);
  next();
});

const blogSchema = Joi.object({
  title: Joi.string().required().min(5).max(50),
  description: Joi.string(),
  body: Joi.string().required(), // strings are trimmed by default
  state: Joi.string().default("draft").valid("draft", "published"),
  createdAt: Joi.date().max("now").default(Date.now()),
  lastUpdatedAt: Joi.date().min(Joi.ref("createdAt")).default(Date.now()),
  readCount: Joi.number().min(0).default(0),
  tags: Joi.array().items(Joi.string()),
});
Now, let's go ahead to implement the blog controllers
cd ./controllers
touch blogControllers.js
blogController.js
// blogController.js
const Blog = require("../models/blogModel");
const catchAsync = require("../utils/catchAsync");
const ApiFeatures = require("../utils/apiFeatures");
const AppError = require("../utils/appError");

exports.getAllBlogs = catchAsync(async (req, res, next) => {
  const processedQuery = new ApiFeatures(
    Blog.find({ state: "published" }),
    req.query
  )
    .filter()
    .sort()
    .project()
    .paginate();
  const blogs = await processedQuery.query;
  return res.status(200).json({
    status: "success",
    results: blogs.length,
    page: req.query.page || 1,
    data: {
      blogs,
    },
  });
});

exports.getAllMyBlogs = catchAsync(async (req, res, next) => {
  const queryFilter = { author_id: req.user._id };
  const processedQuery = new ApiFeatures(Blog.find(queryFilter), req.query)
    .filter()
    .sort()
    .project()
    .paginate();
  const blogs = await processedQuery.query;
  return res.status(200).json({
    status: "success",
    results: blogs.length,
    page: req.query.page || 1,
    data: {
      blogs,
    },
  });
});

exports.getBlog = catchAsync(async (req, res, next) => {
  const id = req.params.id;
  const blog = await Blog.findOne({ _id: id, state: "published" }).populate({
    path: "author_id",
    select: "-__v",
  });
  if (!blog) return next(new AppError("Blog does not exist!", 404));
  blog.readCount += 1; // Increases the blog's read by 1
  await blog.save(); // persist it
  return res.status(200).json({
    status: "success",
    data: {
      blog,
    },
  });
});

exports.createBlog = catchAsync(async (req, res, next) => {
  const blogData = {
    ...req.body,
    author: `${req.user.firstName} ${req.user.lastName}`,
    author_id: req.user._id,
  };
  const { title, body, description } = blogData;
  // Assuming it takes about 1 minute to read 200 words (1 min === 200 words)
  const wordsCount =
    title.split(" ").length +
    body.split(" ").length +
    (blogData.description ? blogData.description.split(" ").length : 0);
  const readingTime = wordsCount / 200;
  blogData.readingTime = readingTime; // setting the blog reading time before creating
  const blog = await Blog.create(blogData);
  return res.status(201).json({
    status: "success",
    data: {
      blog,
    },
  });
});

exports.patchBlog = catchAsync(async (req, res, next) => {
  const id = req.params.id;
  const blog = await Blog.findById(id);
  if (!blog) return next(new AppError("Blog does not exist!", 404));
  if (blog.author_id.toString() !== req.user._id)
    return next(
      new AppError(
        "Forbidden! You do not have the permission to carry out this action!",
        403
      )
    );
  req.body.lastUpdatedAt = Date.now(); // updates the lastUpdatedAt to the present
  const updatedBlog = await Blog.findByIdAndUpdate(id, req.body, {
    runValidators: true,
    new: true,
  });
  return res.status(200).json({
    status: "success",
    data: {
      blog: updatedBlog,
    },
  });
});

exports.deleteBlog = catchAsync(async (req, res, next) => {
  const id = req.params.id;
  const blog = await Blog.findById(id);
  if (!blog) return next(new AppError("Blog does not exist!", 404));
  if (blog.author_id.toString() !== req.user._id)
    return next(
      new AppError(
        "Forbidden! You do not have the permission to carry out this action!",
        403
      )
    );
  await Blog.findByIdAndDelete(id);
  return res.status(204).json({
    status: "success",
    data: null,
  });
});
This file handles CRUD operation on the Blog collection.
A class called APIFeatures is imported whose instance has methods that handle sorting, filtering, pagination, and projecting of the blogs returned in the GET /blogs and GET /blogs/my routes.
Let's go ahead and create this class in apiFeatures.js
cd ./utils
touch apiFeatures.js
apiFeatures.js
// apiFeatures.js
class ApiFeatures {
  constructor(query, queryParams) {
    this.query = query;
    this.queryParams = queryParams;
  }
  filter() {
    const reservedKeys = [
      "page",
      "sort",
      "limit",
      "fields",
      "author_id",
      "author",
      "tags",
      "title",
    ];
    const queryFilter = { ...this.queryParams };
    // Filtering
    reservedKeys.forEach((key) => delete queryFilter[key]);
    this.query = this.query.find(queryFilter); // updates the query
    if (this.queryParams.author) {
      this.query = this.query.find({
        author: { $regex: this.queryParams.author, $options: "i" }, // return documents whose author field includes the author query params value
      });
    }
    if (this.queryParams.tags) {
      const tags = this.queryParams.tags.split(",").map((tag) => tag.trim());
      this.query = this.query.find({ tags: { $all: tags } }); // returns documents whose tags array contains all the tags specifed in any order
    }
    if (this.queryParams.title) {
      this.query = this.query.find({
        title: { $regex: this.queryParams.title, $options: "i" }, // return documents whose title field includes the title query params value
      });
    }
    return this;
  }
  sort() {
    if (this.queryParams.sort) {
      const sortBy = this.queryParams.sort.split(",").join(" ");
      this.query = this.query.sort(sortBy);
    } else {
      this.query = this.query.sort("-createdAt");
    }
    return this;
  }
  project() {
    // Projecting (Selecting only specific fields)
    if (this.queryParams.fields) {
      const fields = this.queryParams.fields.split(",").join(" ");
      this.query = this.query.select(fields);
    } else {
      this.query = this.query.select("-__v");
    }
    return this;
  }
  paginate() {
    const page = this.queryParams.page || 1;
    const limit = this.queryParams.limit || 20;
    const skip = (page - 1) * limit;
    this.query = this.query.skip(skip).limit(limit);
    return this;
  }
}

module.exports = ApiFeatures;
CRUD operations on User collection
Next, we create the user routes and then their controllers. Ths process should be familiar by now. In userRoutes.js ,
// userRoutes.js
const express = require("express");
const passport = require("passport");

const {
  getAllUsers,
  getUser,
  updateMe,
  updateMyPassword,
  deleteMe,
} = require("../controllers/userController");

const router = express.Router();

router.route("/").get(getAllUsers);
router.route("/:id").get(getUser);
router
  .route("/updateMe")
  .patch(passport.authenticate("jwt", { session: false }), updateMe);
router
  .route("/updateMyPassword")
  .patch(passport.authenticate("jwt", { session: false }), updateMyPassword);

router
  .route("/deleteMe")
  .delete(passport.authenticate("jwt", { session: false }), deleteMe);

module.exports = router;
Let's create the userController.js file
cd ./controllers
touch userController.js
In userController.js,
// userController.js
const User = require("../models/userModel");
const ApiFeatures = require("../utils/apiFeatures");
const catchAsync = require("../utils/catchAsync");
const AppError = require("../utils/appError");
const genToken = require("../utils/genToken");

const filterBody = (body, ...allowableFields) => {
  const filteredBody = {};
  Object.keys(body).forEach((field) => {
    if (allowableFields.includes(field)) filteredBody[field] = body[field];
  });
  return filteredBody;
};

exports.getAllUsers = catchAsync(async (req, res, next) => {
  const processedQuery = new ApiFeatures(User.find(), req.query)
    .filter()
    .sort()
    .project()
    .paginate();
  const users = await processedQuery.query;
  return res.status(200).json({
    status: "success",
    results: users.length,
    page: req.query.page || 1,
    data: {
      users,
    },
  });
});

exports.getUser = catchAsync(async (req, res, next) => {
  const id = req.params.id;
  const user = await User.findById(id);
  if (!user) return next(new AppError("User does not exist!", 404));
  return res.status(200).json({
    status: "success",
    data: {
      user,
    },
  });
});

exports.updateMe = catchAsync(async (req, res, next) => {
  // Prevent password update here
  if (req.body.password || req.body.confirmPassword)
    return next(
      new AppError(
        "This route is not meant for password updates. Use /users/updateMyPassword instead.",
        403
      )
    );
  // Filter the incoming update
  const filteredBody = filterBody(req.body, "firstName", "lastName", "email");
  // Update
  const user = await User.findByIdAndUpdate(req.user._id, filteredBody, {
    new: true,
    runValidators: true, // runs validators for only updated fields, unlike save (validateBeforeSave) which runs for all fields regardless
  });
  return res.status(200).json({
    status: "success",
    data: {
      user,
    },
  });
});

exports.updateMyPassword = catchAsync(async (req, res, next) => {
  // 1. Get the User
  const user = await User.findById(req.user._id).select("+password");

  // 2. Check the provided password
  const { currentPassword, password, confirmPassword } = req.body;
  // Checks if current password is indeed provided
  if (!currentPassword) {
    return next(new AppError("Provide your current password.", 400));
  }
  if (!(await user.isCorrectPassword(currentPassword))) {
    return next(new AppError("Incorrect password!", 401));
  }

  // 3. Update password
  // Checks if password and confirmPassword is indeed provided
  if (!password || !confirmPassword) {
    return next(new AppError("Enter your new password and confirm it.", 400));
  }
  user.password = password;
  user.confirmPassword = confirmPassword;
  await user.save({ validateBeforeSave: true });

  // 4. Log user in freshly, basically sending a fresh JWT
  user.password = undefined;
  user.__v = undefined;
  const token = genToken(user);
  return res.status(200).json({
    status: "success",
    token,
    data: {
      user,
    },
  });
});

exports.deleteMe = catchAsync(async (req, res, next) => {
  await User.findByIdAndDelete(req.user._id);
  return res.status(204).json({
    status: "success",
    data: null,
  });
});
This file performs CRUD operations on the User model.
Let's now implement some more authentication features.
We are going to implement the functionality to reset users' passwords should they forget them.
In authRoutes.js,
// authRoutes.js
const {
  forgotPassword,
  resetPassword,
} = require("../controllers/authController");

router.post("/forgotPassword", forgotPassword);
router.patch("/resetPassword/:token", resetPassword);
The latest snapshot of authRoutes.js
// authRoutes.js
const express = require("express");

const {
  signUpUser,
  signInUser,
  forgotPassword,
  resetPassword,
} = require("../controllers/authController");

const router = express.Router();

router.post("/signup", signUpUser);
router.post("/signin", signInUser);
router.post("/forgotPassword", forgotPassword);
router.patch("/resetPassword/:token", resetPassword);

module.exports = router;
Now, let's create the forgot password and reset password controllers in authController.js
// authController.js
const crypto = require("crypto");
const emailSender = require("../utils/emaliSender");

exports.forgotPassword = catchAsync(async (req, res, next) => {
  const { email } = req.body;
  const user = await User.findOne({ email });
  if (!user) return next(new AppError("User does not exist!", 404));
  const resetToken = user.genResetToken();
  user.save({ validateBeforeSave: false }); // persists the changes made in  genResetToken function
  const resetPasswordURL = `${req.protocol}://${req.get(
    "host"
  )}/api/v1/auth/resetPassword/${resetToken}`;
  const body = `Forgot your password? Submit a PATCH request with your new password and confirmPassword to: <a href=${resetPasswordURL}>${resetPasswordURL}</a>.\nIf you didn't forget your password, please ignore this email!`;
  const subject = "Your password reset token (valid for 10 min)";
  try {
    await emailSender({ email, body, subject });
    return res.status(200).json({
      status: "success",
      message:
        "Check your email inbox, a link to reset your password has been sent.",
    });
  } catch (error) {
    user.passwordResetToken = undefined;
    user.passwordResetTokenExpiryTime = undefined;
    await user.save({ validateBeforeSave: false });
    console.log(error);
    return next(
      new AppError(
        "Something went wrong while sending a password resent link to your email. Please try again later.",
        500
      )
    );
  }
});

exports.resetPassword = catchAsync(async (req, res, next) => {
  const token = req.params.token;
  const hashedToken = crypto.createHash("sha256").update(token).digest("hex");
  // Looks for user with the reset token and unexpired!
  const user = await User.findOne({
    passwordResetToken: hashedToken,
    passwordResetTokenExpiryTime: { $gt: Date.now() }, // this confirms that the token hasn't expired
  });
  if (!user)
    return next(
      new AppError("Password reset token is invalid or has expired!", 400)
    );
  const { password, confirmPassword } = req.body;
  // Resets the password
  user.password = password;
  user.confirmPassword = confirmPassword;
  // clears the passwordResetToken details on successful password update
  user.passwordResetToken = undefined;
  user.passwordResetTokenExpiryTime = undefined;
  await user.save({ validateModifiedOnly: true }); // saves and update the passwordModifiedAt field
  // 4) Log the user in, send JWT
  user.password = undefined;
  user.passwordModifiedAt = undefined;
  const jwttoken = genToken(user);
  return res.status(200).json({
    status: "success",
    token: jwttoken,
    data: {
      user,
    },
  });
});
Sending Email
Commonly, users of an application get sent an email when they attempt to change their password. This email would contain instructions or link(s) to achieve a successful password change.
authController.js imports a function called emailSender which the forgotPassword request handler uses to send an email to the email address the client provides.
Let's create this function right away.
cd ./utils
touch emailSender.js
// emailSender.js
const nodemailer = require("nodemailer");

const emailSender = async function (options) {
  let transporter = nodemailer.createTransport({
    host: process.env.EMAIL_HOST,
    port: 465,
    secure: true,
    auth: {
      user: process.env.EMAIL_USER,
      pass: process.env.EMAIL_PASSWORD,
    },
  });
  let mailOptions = {
    from: `"Sonde Omobolaji 🎯" <${process.env.EMAIL_USER}>`, // sender address
    to: options.email, // list of receivers
    subject: options.subject, // Subject line
    text: options.body, // plain text body
    html: `<div>${options.body}</div>`, // html body
  };

  const info = await transporter.sendMail(mailOptions);

  console.log("Message sent %s", info.messageId);
};

module.exports = emailSender;
Before I explain what our emailSender function does, let's create the env variables we used.
In .env ,
EMAIL_HOST="smtp.gmail.com"
EMAIL_USER="Sender gmail address"
EMAIL_PASSWORD="Sender gmail address app password"
This function:
Uses the nodemailer module to send emails from our application.
Creates a nodemailer transporter using SMTP (Simple Mail Transfer Protocol) transport mechanism. In our case, "smtp.gmail.com"
Sets up the message options (who sends what to whom).
Uses the transporter's
sendMailmethod to send the message object.
The body of the mail contains instructions and a link to follow to achieve a successful password reset.
Back in the authController.js , we made use of some user document methods, these methods are defined at the schema level. Let's go ahead creating them in userModel.js.
const crypto = require("crypto");

// Pre document hook to update the passwordModifiedAt field after password change
userSchema.pre("save", async function (next) {
  if (!this.isModified("password") || this.isNew) return next(); // prevents update of passwordModifiedAt field for unmodified password or new document
  this.passwordModifiedAt = Date.now() - 1500; // Setting it to 1.5s in the past because, although we awaited the saving the actual saving in to the db might happen just after the jwt is issued which will then render our token useless. So, setting it just a bit in the past helps us prevent this scenario
  next();
});

// document method for checking correct password
userSchema.methods.isCorrectPassword = async function (providedPassword) {
  return await bcrypt.compare(providedPassword, this.password);
};

// document method for checking if password has been modified after token was issued
userSchema.methods.passwordModified = function (JWT_IAT) {
  if (!this.passwordModifiedAt) return false;
  const JWT_IAT_TS = new Date(JWT_IAT * 1000).toISOString(); // gets the ISO string timestamp of JWT IAT (milliseconds)
  // console.log(new Date(this.passwordModifiedAt), "🎯🎯", new Date(JWT_IAT_TS));
  return new Date(JWT_IAT_TS) < new Date(this.passwordModifiedAt);
};

// document method for generating reset Token
userSchema.methods.genResetToken = function () {
  const token = crypto.randomBytes(32).toString("hex");
  const hashedToken = crypto.createHash("sha256").update(token).digest("hex");
  this.passwordResetToken = hashedToken;
  this.passwordResetTokenExpiryTime = Date.now() + 10 * 60 * 1000;
  console.log(token, hashedToken);
  return token;
};
We also needed a pre-save hook to update the passwordModifiedAt field after a password change.
The latest snapshot of userModel.js
const crypto = require("crypto");
const mongoose = require("mongoose");
const bcrypt = require("bcrypt");
const validator = require("validator");

const Schema = mongoose.Schema;

const userSchema = new Schema({
  firstName: {
    type: String,
    required: [true, "Please provide your firstname."],
  },
  lastName: {
    type: String,
    required: [true, "Please provide your lastname."],
  },
  email: {
    type: String,
    required: [true, "Please provide your email address."],
    unique: true,
    validate: [validator.isEmail, "Please provide a valid email address."],
  },
  password: {
    type: String,
    required: [
      true,
      "It's a dangerous world online! Please provide a password.",
    ],
    minLength: 6,
    select: false, // doesn't add this field on Read query
  },
  confirmPassword: {
    type: String,
    required: [true, "Please confirm your password."],
    minLength: 6,
    select: false,
    validate: {
      validator: function (val) {
        return val === this.password;
      },
      message: "Passwords must match.",
    },
  },
  createdAt: {
    type: Date,
    default: Date.now(),
  },
  passwordModifiedAt: { type: Date },
  passwordResetToken: { type: String },
  passwordResetTokenExpiryTime: Date,
});

// Pre document hook for hashing password before save
userSchema.pre("save", async function (next) {
  if (!this.isModified("password")) return next(); // prevents hashing of unmodified password
  // Hashes the password of the currently processed document
  const hashedPassword = await bcrypt.hash(this.password, 12);
  // Overwrite plain text password with hash
  this.password = hashedPassword;
  // Clear the confirm password field
  this.confirmPassword = undefined;
  next();
});

// Pre document hook to update the passwordModifiedAt field after password change
userSchema.pre("save", async function (next) {
  if (!this.isModified("password") || this.isNew) return next(); // prevents update of passwordModifiedAt field for unmodified password or new document
  this.passwordModifiedAt = Date.now() - 1500; // Setting it to 1.5s in the past because, although we awaited the saving the actual saving in to the db might happen just after the jwt is issued which will then render our token useless. So, setting it just a bit in the past helps us prevent this scenario
  next();
});

// document method for checking correct password
userSchema.methods.isCorrectPassword = async function (providedPassword) {
  return await bcrypt.compare(providedPassword, this.password);
};

// document method for checking if password has been modified after token was issued
userSchema.methods.passwordModified = function (JWT_IAT) {
  if (!this.passwordModifiedAt) return false;
  const JWT_IAT_TS = new Date(JWT_IAT * 1000).toISOString(); // gets the ISO string timestamp of JWT IAT (milliseconds)
  // console.log(new Date(this.passwordModifiedAt), "🎯🎯", new Date(JWT_IAT_TS));
  return new Date(JWT_IAT_TS) < new Date(this.passwordModifiedAt);
};

// document method for generating reset Token
userSchema.methods.genResetToken = function () {
  const token = crypto.randomBytes(32).toString("hex");
  const hashedToken = crypto.createHash("sha256").update(token).digest("hex");
  this.passwordResetToken = hashedToken;
  this.passwordResetTokenExpiryTime = Date.now() + 10 * 60 * 1000;
  console.log(token, hashedToken);
  return token;
};

const User = mongoose.model("User", userSchema);

module.exports = User;
At this point, we are done building the blog API. Well done for making it this far, I am proud of you.
Testing
We can test all our major endpoints by writing and then running unit tests using the Jest testing framework and Supertest.
Let's create a folder called tests to house our test files.
mkdir tests
touch auth.routes.test.js
touch user.routes.test.js
touch blog.routes.test.js
auth.routes.test.js
// auth.routes.test.js
const mongoose = require("mongoose");
const supertest = require("supertest");
const dotenv = require("dotenv");

dotenv.config(); // loads enviroment variables into process.env

const app = require("../app");
const User = require("../models/userModel");

// for testing purposes, we use the test DB (stub)
const TEST_DATABASE_URL = process.env.TEST_DATABASE_URL;

//  Runs before all the tests
beforeAll((done) => {
  mongoose.connect(TEST_DATABASE_URL);
  mongoose.connection.on("connected", async () => {
    console.log("Connected to MongoDB Successfully");
    done();
  });
  mongoose.connection.on("error", (err) => {
    console.log(err, "An error occurred while connecting to MongoDB");
    done();
  });
});

//  Runs after all the tests
afterAll(async () => {
  await User.findOneAndDelete({ email: "wisdomomobolaji@gmail.com" });
  mongoose.connection.close();
});

describe("Test Auth", () => {
  test("POST /api/v1/auth/signup", async () => {
    const newUser = {
      firstName: "Omobolaji",
      lastName: "Sonde",
      email: "wisdomomobolaji@gmail.com",
      password: "qwerty",
      confirmPassword: "qwerty",
    };
    const response = await supertest(app)
      .post(`/api/v1/auth/signup`)
      .set("Content-Type", "application/x-www-form-urlencoded")
      .send(newUser);
    expect(response.headers["content-type"]).toBe(
      "application/json; charset=utf-8"
    );
    expect(response.statusCode).toBe(201);
    expect(response.body.status).toBe("success");
    expect(response.body).toHaveProperty("token");
    expect(response.body.data).toHaveProperty("user");
    expect(response.body.data.user.email).toBe("wisdomomobolaji@gmail.com");
  });

  test("POST /api/v1/auth/signin", async () => {
    const loginDetails = {
      email: "wisdomomobolaji@gmail.com",
      password: "qwerty",
    };
    const response = await supertest(app)
      .post(`/api/v1/auth/signin`)
      .set("Content-Type", "application/x-www-form-urlencoded")
      .send(loginDetails);
    expect(response.headers["content-type"]).toBe(
      "application/json; charset=utf-8"
    );
    expect(response.statusCode).toBe(200);
    expect(response.body.status).toBe("success");
    expect(response.body).toHaveProperty("token");
    expect(response.body.data).toHaveProperty("user");
    expect(response.body.data.user.email).toBe("wisdomomobolaji@gmail.com");
  });
});
blog.routes.test.js
// blog.routes.test.js
const mongoose = require("mongoose");
const supertest = require("supertest");
const dotenv = require("dotenv");

dotenv.config(); // loads enviroment variables into process.env

const app = require("../app");
// for testing purposes, we use the test DB (stub)
const TEST_DATABASE_URL = process.env.TEST_DATABASE_URL;
// A JWT which encodes the one user details which was created before in our database to authenticate protected routes during testing.
const TEST_JWT = process.env.TEST_JWT;

//  Runs before all the tests
beforeAll((done) => {
  mongoose.connect(TEST_DATABASE_URL);
  mongoose.connection.on("connected", async () => {
    console.log("Connected to MongoDB Successfully");
    done();
  });
  mongoose.connection.on("error", (err) => {
    console.log(err, "An error occurred while connecting to MongoDB");
    done();
  });
});

//  Runs after all the tests
afterAll((done) => {
  mongoose.connection.close(done);
});

describe("blogs", () => {
  let newBlogId;
  test("POST /api/v1/blogs", async () => {
    const newBlog = {
      title: "Test blog title",
      description: "Test blog description",
      body: "Lorem ipsum dolor sit amet, consectetur adipisicing elit. Culpa recus andae quibus dam voluptate minim eius. At, tempora ratione fuga perferen dis esse,excepturi nesciunt similique voluptatibus pariatur sin temporibus odit fugiat ipsum. Lorem ipsum dolor sit amet, consectetur adipisicing elit. Culpa recus andae quibus dam voluptate minim eius. At, tempora ratione fuga perferen dis esse,excepturi nesciunt similique voluptatibus pariatur sin temporibus odit fugiat ipsum. Lorem ipsum dolor sit amet, consectetur adipisicing elit. Culpa recus andae quibus dam voluptate minim eius. At, tempora ratione fuga perferen dis esse,excepturi nesciunt similique voluptatibus pariatur sin temporibus odit fugiat ipsum. Lorem ipsum dolor sit amet, consectetur adipisicing elit. Culpa recus andae quibus dam voluptate minim eius. At, tempora ratione fuga perferen dis esse,excepturi nesciunt similique voluptatibus pariatur sin temporibus odit fugiat ipsum.",
      tags: ["jest", "test"],
    };
    const response = await supertest(app)
      .post(`/api/v1/blogs`)
      .set("Authorization", `Bearer ${TEST_JWT}`)
      .send(newBlog);
    expect(response.headers["content-type"]).toBe(
      "application/json; charset=utf-8"
    );
    newBlogId = response.body.data.blog._id;
    expect(response.statusCode).toBe(201);
    expect(response.body.status).toBe("success");
    expect(response.body.data).toHaveProperty("blog");
    expect(response.body.data.blog).toHaveProperty("createdAt");
    expect(response.body.data.blog.readCount).toBe(0);
    expect(response.body.data.blog.state).toBe("draft");
  });
  test("PATCH /api/v1/blogs/:id", async () => {
    const update = {
      state: "published",
    };
    const response = await supertest(app)
      .patch(`/api/v1/blogs/${newBlogId}`)
      .set("Authorization", `Bearer ${TEST_JWT}`)
      .send(update);
    expect(response.headers["content-type"]).toBe(
      "application/json; charset=utf-8"
    );
    expect(response.statusCode).toBe(200);
    expect(response.body.status).toBe("success");
    expect(response.body.data).toHaveProperty("blog");
    expect(response.body.data.blog._id).toBe(newBlogId);
    expect(response.body.data.blog.state).toBe("published");
  });
  test("GET /api/v1/blogs", async () => {
    const response = await supertest(app).get("/api/v1/blogs");
    expect(response.headers["content-type"]).toBe(
      "application/json; charset=utf-8"
    );
    expect(response.statusCode).toBe(200);
    expect(response.body.status).toBe("success");
    expect(response.body.page).toBe(1);
    expect(response.body.results).toBeGreaterThan(0);
    expect(response.body.data).toHaveProperty("blogs");
  });

  test("GET my blogs /api/v1/blogs/my", async () => {
    const response = await supertest(app)
      .get("/api/v1/blogs")
      .set("Authorization", `Bearer ${TEST_JWT}`);
    expect(response.headers["content-type"]).toBe(
      "application/json; charset=utf-8"
    );
    expect(response.statusCode).toBe(200);
    expect(response.body.status).toBe("success");
    expect(response.body.page).toBe(1);
    expect(response.body.results).toBeGreaterThan(0);
    expect(response.body.data).toHaveProperty("blogs");
    expect(response.body.data.blogs[0].state).toBe("published");
  });

  test("GET /api/v1/blogs/:id", async () => {
    const response = await supertest(app).get(`/api/v1/blogs/${newBlogId}`);
    expect(response.headers["content-type"]).toBe(
      "application/json; charset=utf-8"
    );
    expect(response.statusCode).toBe(200);
    expect(response.body.status).toBe("success");
    expect(response.body.data).toHaveProperty("blog");
    expect(response.body.data.blog._id).toBe(newBlogId);
    expect(response.body.data.blog.state).toBe("published");
  });
  test("DELETE /api/v1/blogs/:id", async () => {
    const response = await supertest(app)
      .delete(`/api/v1/blogs/${newBlogId}`)
      .set("Authorization", `Bearer ${TEST_JWT}`);
    expect(response.statusCode).toBe(204);
    expect(response.body).toEqual({});
  });
});
user.routes.test.js
// user.routes.test.js
const mongoose = require("mongoose");
const supertest = require("supertest");
const dotenv = require("dotenv");

dotenv.config(); // loads enviroment variables into process.env

const app = require("../app");
// for testing purposes, we use the test DB (stub)
const TEST_DATABASE_URL = process.env.TEST_DATABASE_URL;
// A JWT which encodes the one user details which was created before in our database to authenticate protected routes during testing.
const TEST_JWT = process.env.TEST_JWT;

//  Runs before all the tests
beforeAll((done) => {
  mongoose.connect(TEST_DATABASE_URL);
  mongoose.connection.on("connected", async () => {
    console.log("Connected to MongoDB Successfully");
    done();
  });
  mongoose.connection.on("error", (err) => {
    console.log(err, "An error occurred while connecting to MongoDB");
    done();
  });
});

//  Runs after all the tests
afterAll((done) => {
  mongoose.connection.close(done);
});

describe("users", () => {
  let aUserId;
  test("PATCH /api/v1/users/updateMe", async () => {
    const update = {
      firstName: "Bolaji",
    };
    const response = await supertest(app)
      .patch(`/api/v1/users/updateMe`)
      .set("Authorization", `Bearer ${TEST_JWT}`)
      .send(update);
    expect(response.headers["content-type"]).toBe(
      "application/json; charset=utf-8"
    );
    expect(response.statusCode).toBe(200);
    expect(response.body.status).toBe("success");
    expect(response.body.data).toHaveProperty("user");
    expect(response.body.data.user.firstName).toBe("Bolaji");
  });
  test("GET /api/v1/users", async () => {
    const response = await supertest(app).get("/api/v1/users");
    aUserId = response.body.data.users[0]._id;
    expect(response.headers["content-type"]).toBe(
      "application/json; charset=utf-8"
    );
    expect(response.statusCode).toBe(200);
    expect(response.body.status).toBe("success");
    expect(response.body.page).toBe(1);
    expect(response.body.results).toBeGreaterThanOrEqual(1);
    expect(response.body.data).toHaveProperty("users");
  });

  test("GET /api/v1/users/:id", async () => {
    const response = await supertest(app).get(`/api/v1/users/${aUserId}`);
    expect(response.headers["content-type"]).toBe(
      "application/json; charset=utf-8"
    );
    expect(response.statusCode).toBe(200);
    expect(response.body.status).toBe("success");
    expect(response.body.data).toHaveProperty("user");
    expect(response.body.data.user._id).toBe(aUserId);
  });
  // test("DELETE /api/v1/users/deleteMe", async () => {
  //   const response = await supertest(app)
  //     .delete(`/api/v1/users/deleteMe`)
  //     .set("Authorization", `Bearer ${TEST_JWT}`);
  //   expect(response.statusCode).toBe(204);
  //   expect(response.body).toEqual({});
  // });
});
That's it guys, thanks for going through this really long tutorial. I hope you have learned a lot and can now go ahead and implement these features in your own APIs too. If you need me to explain more about any concept or feature implemented in this tutorial please let me know in the comment section.
Completed source code: https://github.com/omobolajisonde/Blogging-app
Live link: https://blog-cm7d.onrender.com/api/v1
API docs: https://github.com/omobolajisonde/Blogging-app#api-reference